Monday, September 17, 2012

Homemade Oreos

I love to bake and as it turns out I am pretty good at it, which turns out to be a little bit of a problem for me. Because I have a constant desire to make super yummy baked goods I end up eating a lot of super yummy (and fattening) baked goods. This has not been very figure friendly for me. So I decided that I needed an outlet for my baking creativity. Thus I came up with Sunday treat sharing. I decided that each Sunday (or Saturday if I just can't wait) I will whip up something fantastic, put a little bit aside for me and my family and then load the rest up onto paper plates and deliver them to friends, neighbors and people we do and don't know from church. This was the first concoction that I made to share.


I love Oreos. Who doesn't? They are an amazing little concoction that seems to be frequently mimicked by bakers. I have another chocolate sandwich cookie that I make a lot, but it is a lot softer and more like a whoopie pie. I will eventually post that recipe because it is super easy and yummy too. But for these cookies I wanted them to be a little bit more true to the original. These cookies are essentially a crisp chocolate sugar cookie, with a stiff cream cheese icing filling. I used cute fluted cookie cutters and a fun imprint maker from Wilton to make the cookies really spiffy looking.

Crisp Chocolate Cookie Recipe:
1 cup butter, softened
2 T shortening, butter flavored is best
1 cup sugar
2 tsp vanilla
1 egg
1 tsp b.p.
1 tsp salt
3/4 cup cocoa powder (I use Guittard dark chocolate cocoa powder)
2 c flour

First things first, preheat your oven to 350 degrees
Then start by mixing the flour, cocoa powder, baking powder and salt together in a bowl. Then cream the butter, shortening and sugar together in a mixer for 1-2 minutes. Then add the vanilla and the egg. Once the liquid elements are thoroughly combined slowly mix in your dry ingredients. You can add them quickly if you want to, but if you do you might end up with a counter covered in flour and cocoa powder like I did.
Once your dough is done mixing it will be a little bit stiff. That is how it is supposed to be. It should not be soft like chocolate chip cookie dough because you are going to roll it out and cut it like a sugar cookie. Now you need to chill the dough. I like to put mine in a gallon size Ziploc bag and smash it into a disc shape in the bag, but you can chill it however you want.


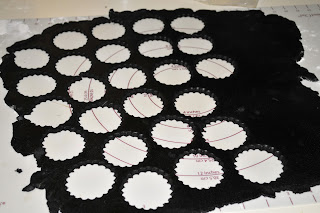
Let the dough chill for at least 30 minutes. Once it is nice and cool and easier to handle, roll it out 1/8 to 1/4 inch thick on a lightly floured surface. Then cut out your cookies with your cookie cutter and place on a lined baking sheet.
You can place them fairly close together because they should not rise very much. You can cut out plain circles, or get fancy with it and cut out any shape you want. I used a two inch cutter for mine and that gave me around 50 cookies, which will give you 25 finished cookies.

Once they are all lined up on the cookie sheet you can do what I did and press a little design into the top of the cookies. I am a cake decorator and therefore have tons of random cake decorating items at my disposal. So when making these cookies I decided to spruce them up by using my Wilton decorative fondant punch. I used it to lightly press the design onto the center of each cookie.


Then bake at 350 for 10-12 minutes, depending on how crisp you want them. Once they are done baking transfer them to a cooling rack and let cool completely.


Now for the Frosting.

Stiff Cream Cheese Icing Recipe:
1 8oz pkg cream cheese - softened
1/2 cup butter - softened
2 tsp vanilla
4-5 cups powdered sugar

This icing is pretty easy. Just mix the softened cream cheese and butter together in a mixer until they are thoroughly combined and then become light and fluffy. That usually takes 3-5 minutes. Then mix in your vanilla and start mixing in your powdered sugar one cup at a time. If you would like a softer icing stop at 4 cups of powdered sugar, if you want it stiffer, use all 5 cups. If you want the icing almost solid like a real Oreo you could even bump it up to 6 cups. My personal preference is 5.

Once your cookies are cool and your icing is made, divide your cookies in half. I like to line them up and flip half of them over. Then spread your icing on one cookie and then cover with a second cookie. How much filling you put in is really up to you. I like my icing to be about as thick as one of the cookies. My husband on the other hand prefers much more icing than that. You can spread the icing on with a knife or use a round tip and a piping bag to swirl it on. Because of my plethora of cake decorating supplies I used a #12 tip to swirl the icing onto the cookie.
I prefer piping the icing on because it goes on fast, and even and clean. I think that is it. Now that they are all iced and sandwiched go ahead and eat up. Because they are nice and crisp like a real Oreo they do really well with a glass of milk.




Monday, September 10, 2012

Chocolate Fudge Frosting


Whenever I make a cake or cupcakes for my family, this is the frosting that they request. My mom is the worst when it comes to snitching this frosting. One time she went home with an entire container full of this frosting. She ate it  like fudge a spoonful at a time over the next few days. When it is placed in the refrigerator it hardens a little bit and tastes just like chocolate fudge. It is a magical thing to have on hand when you are in need of a chocolate fix.

Chocolate Fudge Frosting

1 C. butter (it must be room temperature or slightly warmer, or it will mess up the chocolate later)
1 1/2 tsp. vanilla
3 T. milk
3/4 C. cocoa powder (I prefer dutch cocoa)
1/2 C. melted chocolate (semi-sweet or dark)
3 C. Powdered Sugar

Mix the room temperature butter, vanilla, milk  until it is light and fluffy, which usually takes 1-3 minutes. Then add the cocoa powder slowly until the cocoa powder is completely combined with the liquids and the butter. Then slowly  mix in your melted chocolate. This is where it is imperative that your butter was not cold, because if it is, the melted chocolate will harden and give you little chunks of chocolate. You do not want gritty chocolate frosting.

After the melted chocolate has been fully incorporated into the butter mixture start adding your powdered sugar a little at a time. Once all of the powdered sugar is in you can add a little more milk if you would like to make it thinner consistency. Or you can add more powdered sugar if you want it to be more solid and  fudge like. Spread it on your favorite treat or just eat it by the spoonful. I find I like it with equally chocolaty cake or cupcakes as well as with a good yellow or butter cake.

Enjoy!

Saturday, September 8, 2012

Butternut Squash Soup


Part of my quest for a lovely life includes eating fresh and healthy foods. Where I live they have one of the largest producer only farmers markets in the country. They hold the farmers market every Saturday morning year round, and they hold it on Wednesday evenings during the summer as well. I decided to go there and see what yummy things I could find. One of the things I came home with was a beautiful butternut squash.


The first time that I decided I could possibly like Butternut Squash was when I was 16. We were at my cousins wedding reception at a super cute little Inn just south of Park City Utah. As the reception was drawing to a close my dad decided that he wanted to go to the little room that served as the restaurant for the Inn and order some of their butternut squash soup. I have no idea why he decided that, but I am glad that he did, because he invited me to come with him. After a few cautious bites I decided I liked it. Since then I have made my own butternut squash soup many times, and this is the recipe I have ended up with. It is the perfect soup to eat on a cold day, especially with warm rolls or bread. And with the fall weather rolling in, and butternut squash coming in to season it is the perfect time to try this lovely little dish.

Butternut Squash Soup

2-4 lb. Butternut squash
2 T. Butter
1 medium white or yellow onion
2 carrots
3 cloves garlic
1/2 -1 tsp. salt
1/4-1/2 tsp. pepper
1/8- 1/4 tsp. nutmeg
2 bay leaves
1 T. brown sugar
3-5 C. chicken or vegetable stock
1/2-1 C. cream

This recipe is hard to give exact measurements for, because it all depends on the size of the squash you bring home. But this recipe will gives you the right range to work in.


To begin with, you will want to prep all of your vegetables. Dice the onion, and peel and dice the carrot. In a large pot melt the butter over medium high heat, then add the onion and carrot and cook until softened (about 7-8 minutes). Then chop up your garlic and toss that in the pot and let it cook until it is fragrant (about 1 minute). Then pour in 1 cup of the chicken or vegetable broth (I prefer chicken broth because it adds more flavor) and add the salt, pepper, bay leaves, nutmeg and sugar. Simmer the onion mixture until you are ready to add the butternut squash.

 Peel and then cut the butternut squash into about 1 inch cubes, then throw them in the pot. Cover with just enough broth to cover the squash. You want enough liquid to cook the squash, but not too much, otherwise your final soup product will be really runny and watery. Once the mixture comes to a boil, cover with a lid and turn the heat down to medium-low. let it cook for 20-30 minutes, or until the squash is nice and mushy.


Once the squash is thoroughly softened, you will remove the bay leaves and then process the soup. To get the soup creamy and smooth you will need to run the soup through a blender or food processor, or use my favorite new kitchen gadget, the immersion blender. At this point you can choose how chunky you want the soup. This is where my picky factor kicks in. I really don't like any lumps in this soup, so I make sure it is completely smooth and lump free.


After you have smoothed out your soup chunks you will want to add the cream. With a smaller batch of soup I only add about 1/2 cup, but if I used a larger squash I will end up using a whole cup of cream. Add however much you want to get the soup to a consistency that you like. If you want it really thick you might only want to add 1/4 cup.  Make sure you save 1-2 tablespoons of the cream for serving. I absolutely love drizzling a little bit of the cream over my soup once it is in the bowl. It adds a cool creaminess to it that complements it so well! Or you could try adding a dollop of sour cream, or sprinkle it with some bits of bacon or croutons. Have fun with it. I sure did.


Enjoy!

Friday, September 7, 2012

Baby Hair Flowers

Back in February 2011 I found out I was pregnant. I had no idea what I was having yet, but I secretly (and not so secretly) hoped I would have a girl. I was convinced I would have a little boy but went a head and decided to mess around with making little flower hairclips for baby girls anyway. The school that I taught at was going to be having a craft fair anyway, and I figured I could sell them there even if I didn't end up with a girl. Lucky for me I was able to sell some and have a baby girl to wear them! After reading and watching almost every hair clip and hair flower tutorial I could find I went to the craft store, bought some teal fabric (I think it was a nylon fabric. It needs to be one that can melt, not burn.) and some jewels and buttons and whipped out these babies...
They were a little bit time consuming, but not too difficult. All you need is fabric that will melt, a hot glue gun, a pen, scissors thick paper and a flower shaped template. I made and then printed out this flower template in approximately 1/4 to 1/2 inch increments starting with 3 1/2 inches as my largest and 1 inch as my smallest.  You could do this with any flower shape you want. I have since done some flowers with just 5 petals that are really pretty and some that I have cut free form and some that are just circles. They all turn out pretty, it is just personal preference. Here is a copy of the template I made.


After I printed and then cut out my templates on a thick card stock I chose which petal sizes I wanted for each flower and traced them on my fabric. I just used a regular old black pen that I had lying in my desk. I tried to use my sewing chalk and then a pencil to trace the templates, but they just didn't quite work, so I used gold old fashioned ink and it did the trick. Just make sure that when you are cutting your flowers out of the fabric that you make your cuts inside the pen line, that way you wont have any little black or blue bits left on your finished flower. For some flowers I would use 2 petals of each size and stagger them and others I would use one petal in each size. I like the way both of them look. Once again, personal preference.

Once all of your petals are cut out of the fabric the fun part begins. This is the point where being a little bit of a pyro makes things enjoyable. You need to run the edges of each of your petals over a flame to seal the edges and keep them from fraying as well as give the edge of the petal a slight curl. This part takes a little practice. If you hold the edge of the fabric for too long it will shrivel up into an unusable mass. If you don't do it long enough it will start to fray  and your flower will slowly unravel while it is in your (or your childs) hair. I have had both happen, so be careful.

Once all of the edges have been sealed and curled you can either take the time to sew them or whip out the hot glue gun and just put a little dab of glue in the center of each petal and stack them and turn them until you like the way your flower looks. Then glue (or sew) some kind of a center into place. I have used buttons, beads and gemstones for this part, as well as scrap booking embellishments and they all work great! It is just a matter of what you can find and what looks cute to you. 

Once your flower is done you can either hot glue a little hair clip to the back of your flower or you can attach it to a bobby pin, or to clothes or a headband, or a bag or shoes. They are so versatile, you can use them anywhere. I used alligator clips and made a bunch of interchangeable ones for my baby girl. they can be clipped onto any of her headbands or hats and even pinned to her onesies. Then when she finally has some hair they can clip right into her hair. I love these little flowers and hope you found my brief tutorial in how to make them helpful.

Here is the final product on my pretty little babies head.

Where To Begin...

I am starting this blog as a digital diary of my quest for a Lovely Life. I feel like I have had to put my desire for an aesthetically beautiful life on hold until we have more money, a permanent home and until what we call "real life" can begin once my husband is done with grad school and gets a big boy job.. I am tired of waiting. I have been waiting for almost 5 years to begin my Lovely Life and with two more years of grad school ahead of us I just can't wait anymore. I need to satisfy the urge that I have to create a beautiful world around me, and I need to start doing it NOW! This blog is meant as an outlet for me and maybe a guide for others. I cook and craft all the time, so I figure I can share those recipes and ideas with others through this blog. Well, lets begin!